Time to take a few paragraphs to explain edge bevel angle and how I tune it create knives that excel in different situations and purposes.
It’s fairly simple really, my experience confirms that the bevel angle that your Mora 106 carving knifes comes with, that being a 28 degree bevel (14 degrees on each side) is generally the best balance of all important attributes. Straying from this 28 is where you can create a knife that has a slightly different strength and purpose.
Lets go down in angle first, to say 25 or 26 degrees. This more acute, finer bevel is going to feel “sharper” or lower friction. It’s going to cut across grain easier, so picture that cut around the front of the bowl of the spoon early on when things are still a little thick. A low angle bevel is going to be longer, granted the blade thickness is maintained among other knives compared. That long bevel is going to engage into a heavy cut and stay put. That means early in the spoon carving process the lower angle bevels are great for removing heaps of wood fast. Low friction, heavy cuts, chips are flying, everything is coming down to shape pretty quick! Remember I said “feels sharper”, in reality this knife is probably less sharp pretty quickly after putting it to use. The metals capability to hold a true edge at the lower angle is going to be slightly reduced compared to that same blade at say 30 degrees, that is just the nature of the material and the math. But the fact that the overall wedge of the blade cross section is more acute means that as long your trying to remove a large slice of wood, this blade will feel low friction as long as the true edge is reasonably sharp.
Here Emmet is executing what we often call the “band saw stage”. He’s carving the circumference of the spoon but keeping things thick enough to adjust other planes slowly as he goes. This cut right here is where a 26 angle shines, as he’s taking a substantial cut across grain at the front of the bowl. There is a lot of friction here and your hands will fatigue.
But lets take our “reasonably sharp” low angle edge and try to attack that little fuzzy fiber spot in the turn around of the bowl to handle neck transition. Weird, now this thing feels really dull! I’m trying to finesse this edge through this tiny little blemish and it’s really not doing much for me. Feels like one step forward, one step back. A couple of times it even got a little hung up in the grain and bit of way more than I wanted it to, so I actually just took like 5 steps back. Damn!
So in my opinion it’s time to switch to a 30 degree edge, or at least a 28 degree that’s in better shape, maybe one you have saved for just finish work. I digress, I’ll stick with talking about the 30 degree first. Roughing out a spoon with a 30 degree is a slog, it feels like running in boots as compared to sneakers. The cross section of the 30 degree bevel is even more of a wedge that you’re trying to push through the fibers and the especially difficult cross grain fibers are where you’ll really feel the difference. But this more obtuse wedge is better at two things. It will hold it’s finest edge slightly better, and it intentionally slows you down when the going gets detailed. It’s not going dive as deep or remove as much wood. It will skim the surface better, take the a thin slice and keep you out trouble so you can clean up all the pesky spots. Got some tiny micro chamfers to add to the edges of the bowl? The 30 degree bevel will float through these high risk cuts where the 26 degree will dive in, rip off a huge chunk and laugh at you for being so bold.
Here Emmet is nearly finished and adding those tiny micro chamfers to all the edges. This is great time to use the 30 degree bevel knife. Here you’re not looking for speed or ease, you’re looking for control. The more obtuse bevel angle will ride higher, shave thinner, and avoid “overcooking” the cut and removing more wood than you hoped. Saving a knife for this work also means you have one knife that is far sharper and ready to really perfect things.
So there you have a roughing knife and finish knife, just by changing the bevel angle. We’re talking about flat bevel here, no convexing or secondary bevel, that would change the formula completely and this entire conversation would be out the window. The belly profile (refer to the last blog post), and the thickness of the blade and bevel will also play into the characteristic of the cut, but we’ll take these explanations one at a time. I personally believe the low angle knives are only useful for experienced carvers with an eye to efficiency. If you don’t understand grain flow around a spoon yet the 26 is just going to punish you and tear off huge chunks you weren’t ready for. (Emmet is shaking his head now in protest) What are you in a rush for? You’re learning a craft, not trying to squeeze every spoon into 40 minutes to make profit margins work. Get the 28 and maybe the 30 just to see, skip the 26. But maybe it’s time to pick up the pace a bit, and lower the strain on the hands? Ok, now you can try that 26.
So now let’s bring it full circle all the way back to the 28 degree. I wouldn’t be without a 28 degree, or actually a couple of them because I carve for a living (handles and sheaths, but yes I still have to carve to finish my products). The 28 is the best balance of all cutting attributes if you’re not looking to create a tool kit with a massive number of specialized tools. You can’t go wrong with 28, but you might be able to more right with one of the others. That is kind of what like to offer, “more right”
And now because you might be wondering if any of this applies to hook knives, Yea it probably does, but I don’t go there. I match the bevel designs and angles on my hook knives to the depths at which they are designed cut and hollow. A open hook designed for flatter broader bowls has a bevel tuned to cut across and shallow rather than down into and then out like a hook fo carving scoops. That’s another blog post though
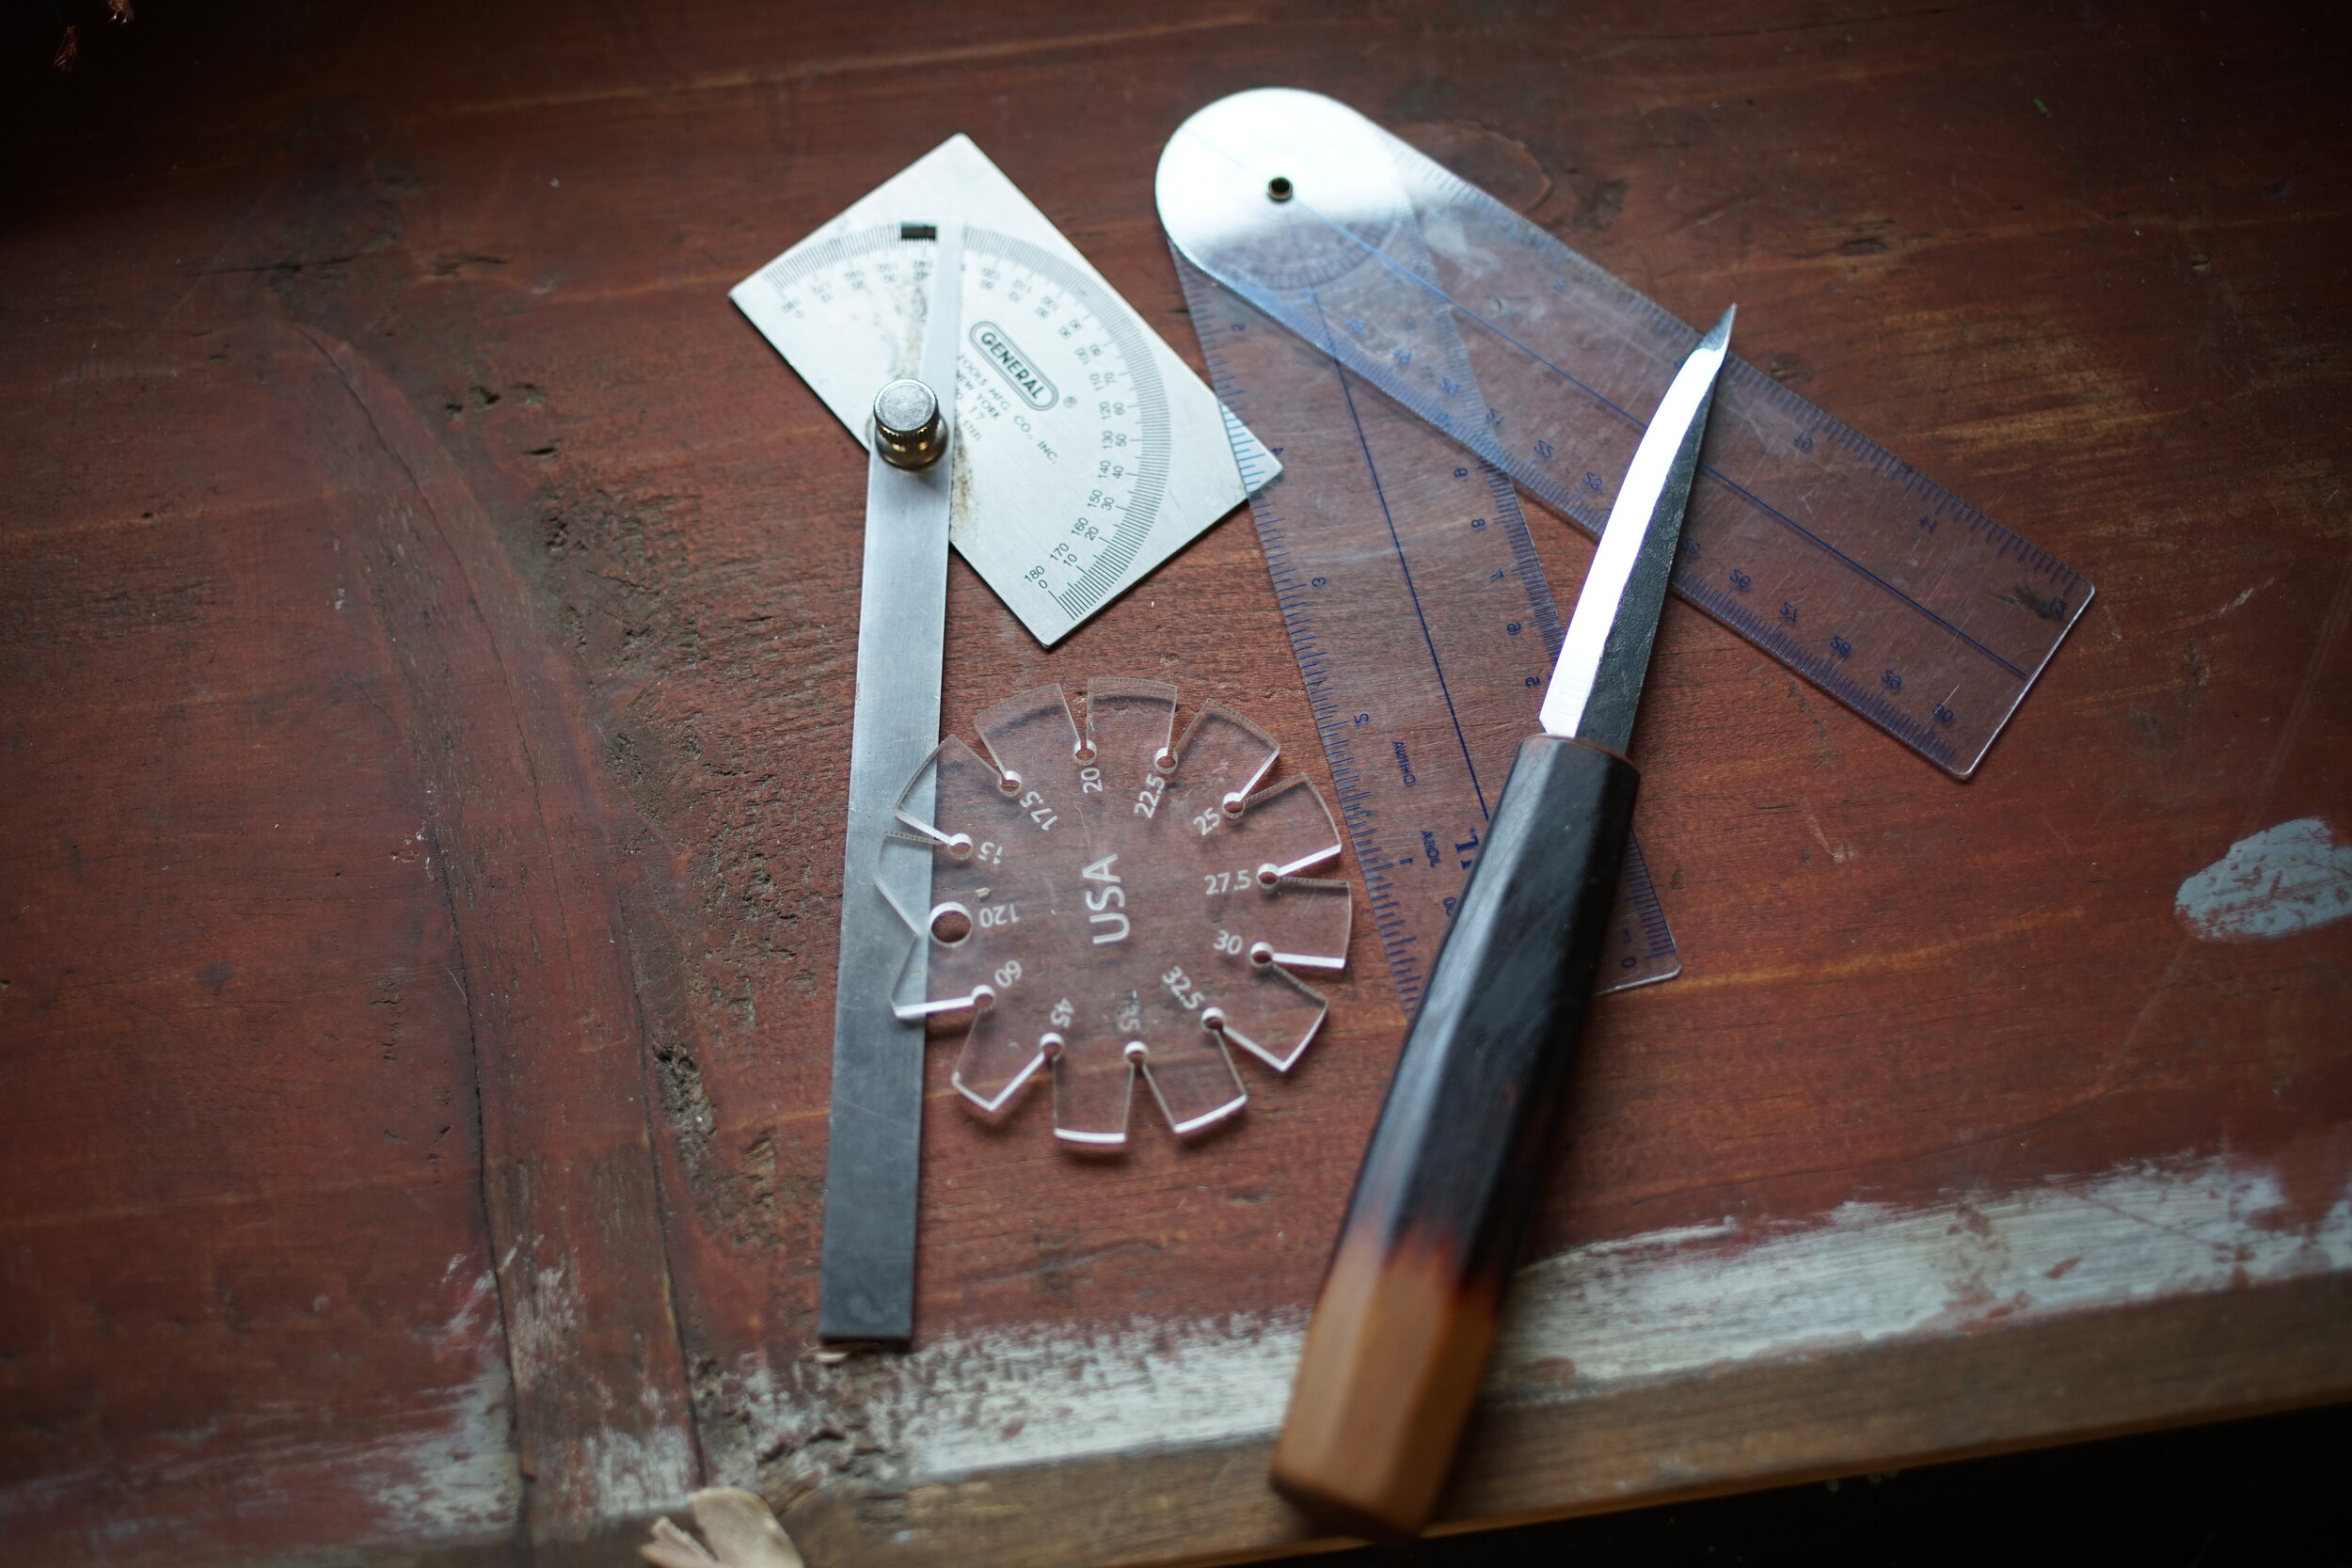
A few tools I use to measure to bevel angles. I would never bring a finished tool to the metal protractor for fear of nicking it. I use the metal one in the rough stages of sharpen as it’s the most acurate. The plastic coins are the least accurate, but offer a quick way to just see where a bevel might be at when you have no idea. I always bring that one to events so when people inevitably say “I wonder what my bevel is” I can tell then roughly what I think.
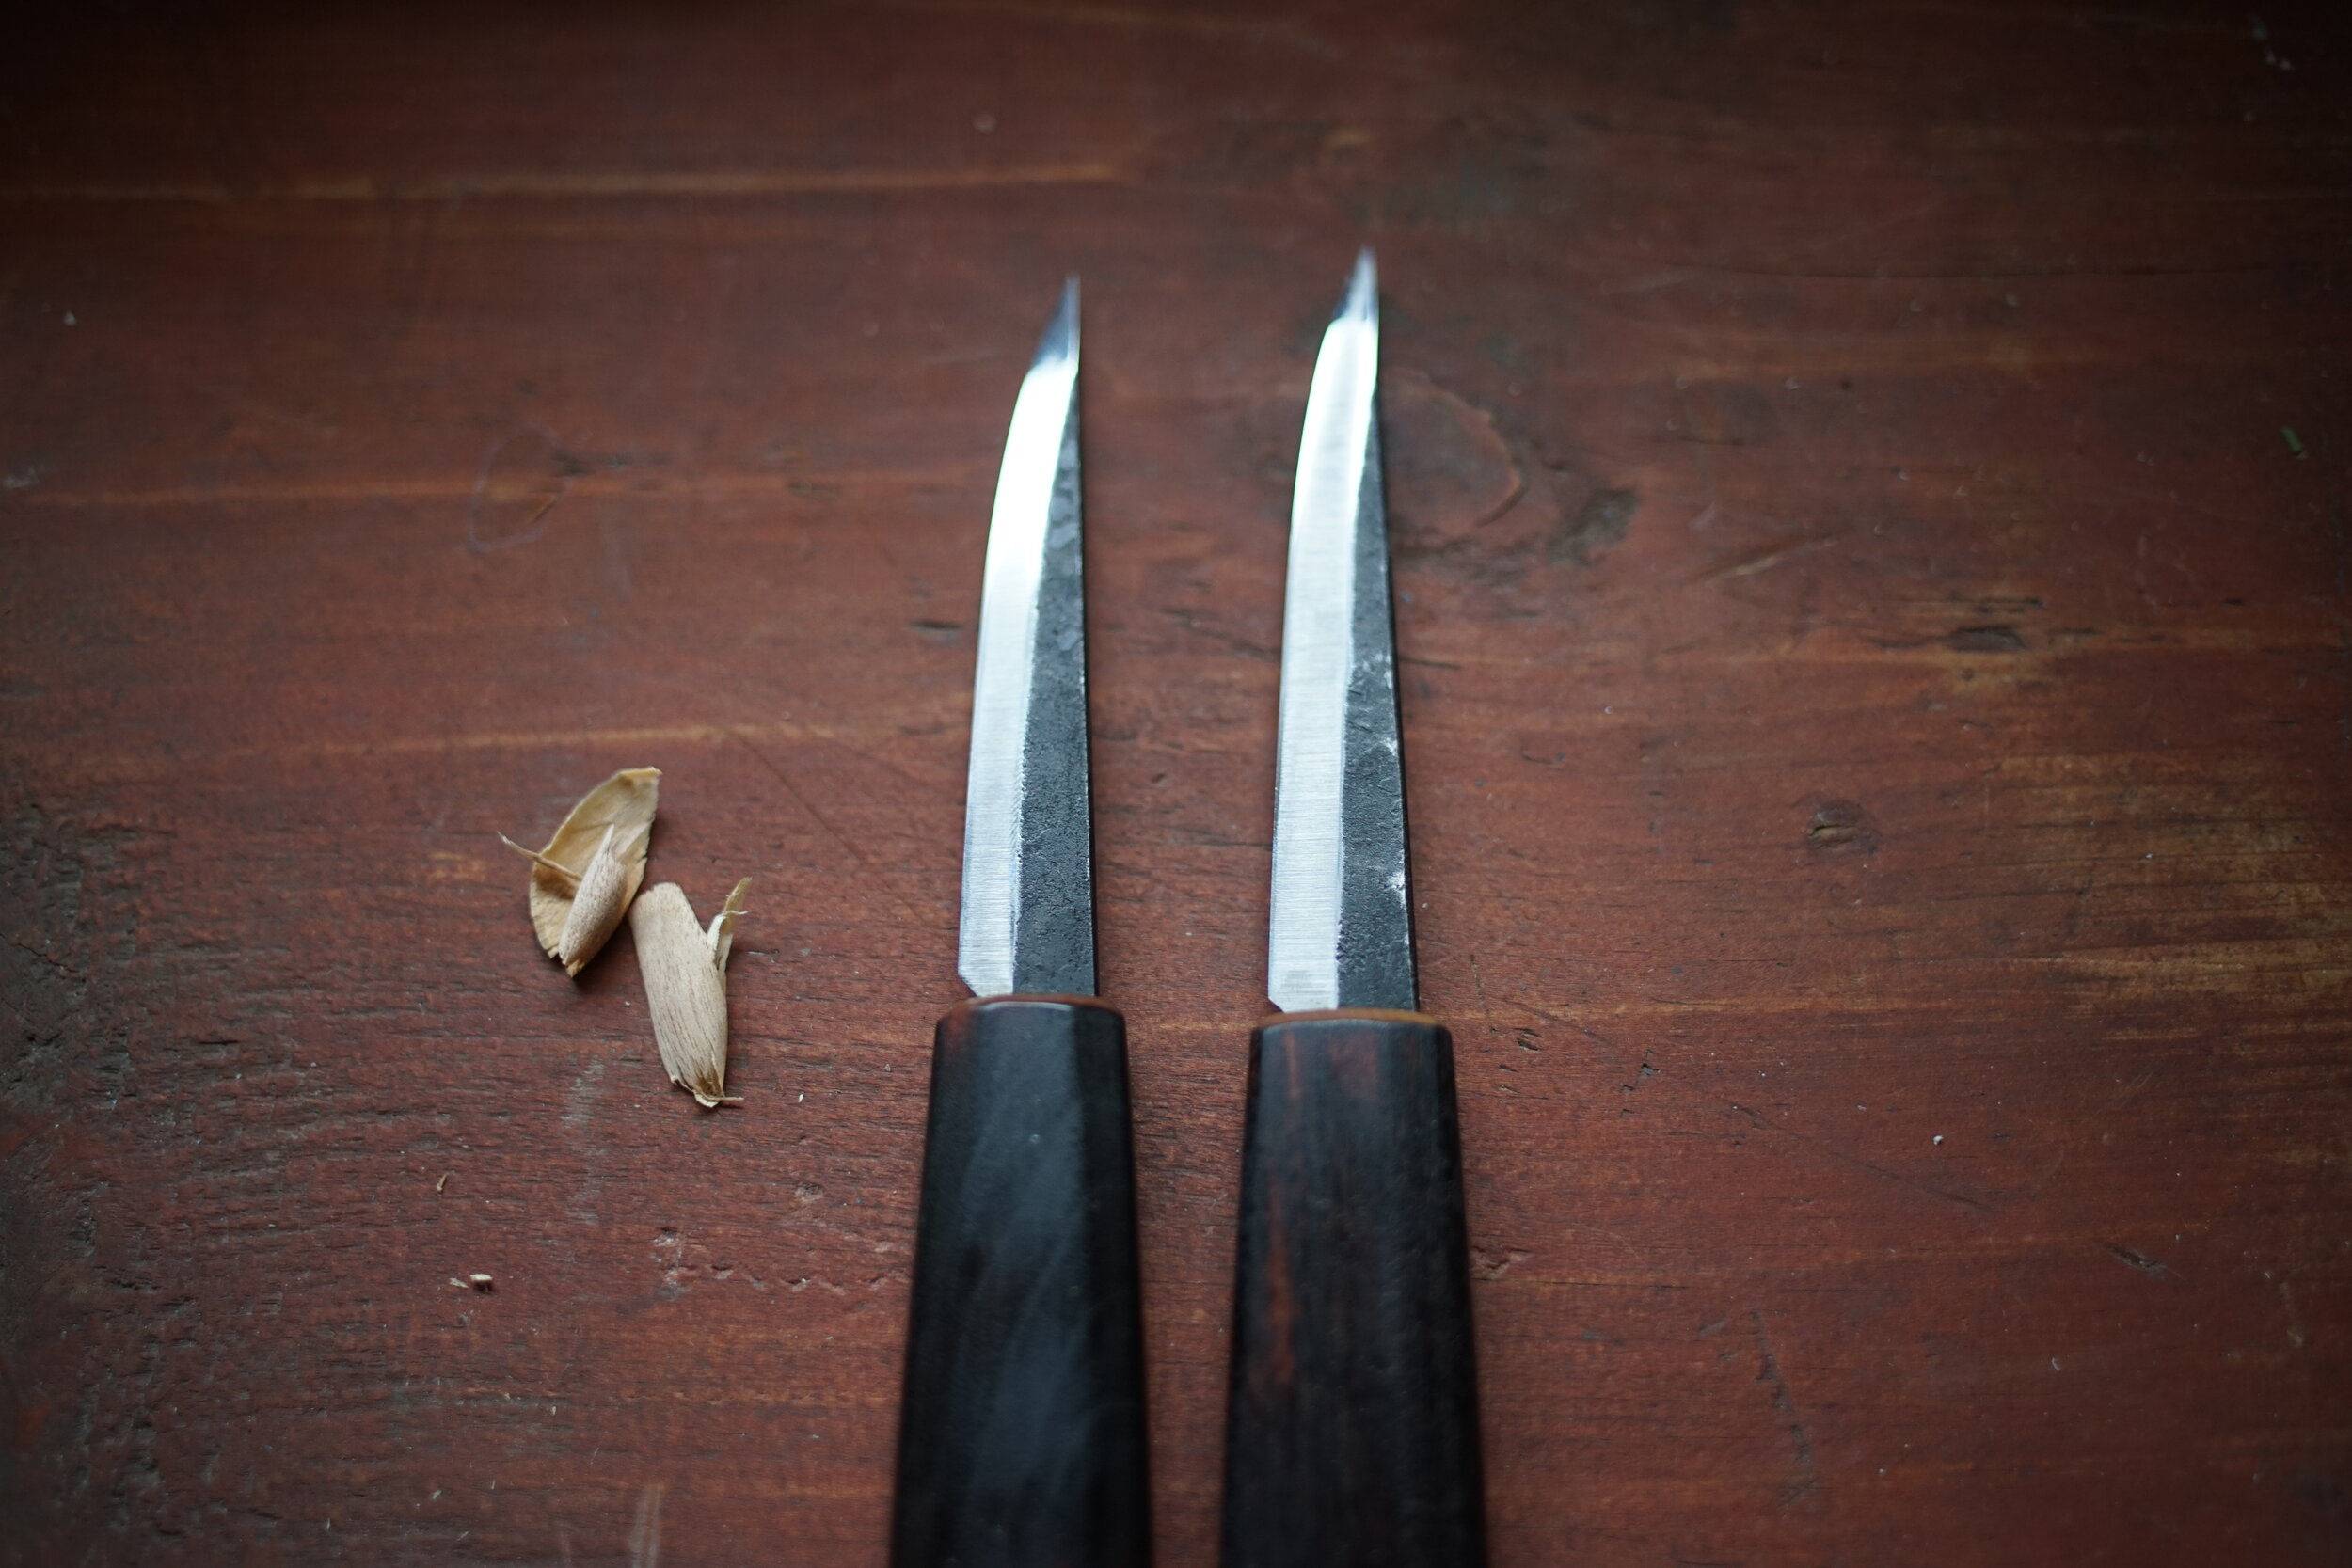
My trained eye can often guess a bevel angle at a quick glance. These two blades are the same thickness of 3mm. The 30 bevel on the left is visibly shorter than the 26 bevel on the right. Think about the angles and math quickly and it will make sense. That long bevel is one of the reasons Low angle knives take big bites, but are little tougher to control and steer. That big bevel is going to find a course and hold it, like a long set of downhill skis. The shorter bevel will steer in and out better like a short set of slalom skis.